Rings:
Take some plates (make sure they are different sizes) that you would find from a thrift store, some candle sticks, and strong glue. Put some glue on the bottom of one of the candle sticks and stick it onto the front of the biggest plate. Then put some glue on the top of that candle stick and stick it on to the bottom of the medium size plate. Lastly glue on your last candle stick to the bottom of the medium plate and glue on the smallest plate to the top. You should have a display to put all of your rings on. You do not have to make it 3 plates high you can do just 2 plates. Just have fun with different kinds of plates and candle sticks from the thrift store which is amazing because you don't have to pay much money!
Necklaces:
Take a piece of drift wood and buy 4-5 cute door knobs. Measure and drill holes for the knobs along the drift wood and put in your knobs. You can even apply a dot of glue to the bottom of each knob to fasten it in but it is not necessary. Now, all you need to do is put it onto a wall and put your necklaces on it. It's that easy!
Now you have not only some excellent ways to organize your jewelry but also some great decor pieces!
YOUKRAFTY
Crafting. Recipes. Reviews. Fun. and more!
Monday, April 20, 2015
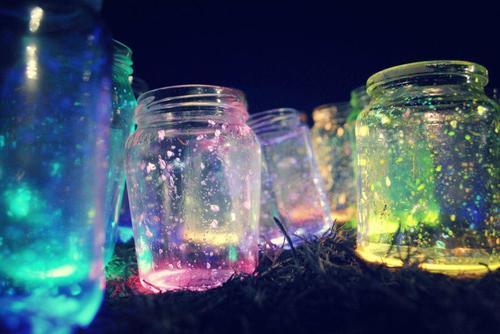
"Fireflies In a Jar" Night Lantern
This is simple and beautiful (especially when made with assorted colors). A great thing to take outside on a summer night or to make at a sleepover with friends.
Step 1) Cut open a glow stick and shake contents into a mason jar. Be very careful with this as it can be messy. Next add diamond glitter or any color glitter that you desire.
Step 2) Seal the top with the lid and make sure it stays on tight.
Step 3) Shake your jar and watch all the colors bloom!
Now you have the firefly effect. Simple and beautiful! (Hint: Add more colors to the jar to make it look brighter and prettier.)
Transfer Photo Onto A Piece of Wood
Here's a super easy way to take a photo and make it into a stunning decoration. Enjoy!
Step 1) Take a slab of wood (however big or small your picture is) and with a paintbrush cover it with a gel medium.
Step 2) Place paper picture side down.
Step 3) Smooth out all of the bubbles
Step 4) Let it dry overnight
Step 5) Take a wet/damp rag and gently rub wet paper off
Step 6) Lastly cover with mod podge and let dry!
There you have a beautiful picture now on wood!
Easy DIY Sharpie Mug!
These are a really good gift idea. Make personalized mugs for all your friends! It's so easy and fun to do! Here's what you'll need:
- white coffee mugs
- black fine point Sharpies
Write/draw whatever you desire on your mug and then simply bake for 30 minutes at 350 degrees!
12 Beneficial Uses for Coconut Oil
If you didn't already know, coconut oil is great for a hair conditioner, but there are many more than just that. Here are 12 ways to use coconut oil for beauty purposes. Enjoy!
1. Oil Pulling
If you haven't heard the buzz about oil pulling yet, it's time to get on the bandwagon. Swishing coconut oil around in your mouth for 20 minutes a day (preferably at the beginning of the day, before you brush your teeth) may help to detoxify your body, cure headaches, whiten teeth, and more.
2. Softening Cuticles
If you wash your hands often or your cuticles just need a little T.L.C., apply coconut oil to your fingers twice a day.
3. Treating Dry Ends
Apply a pinch of coconut oil to the ends of your hair to help dry, damaged tips get a huge dose of moisture.
4. Exfoliating
Coconut oil makes a great base for DIY body scrubs. Mix it with granulated sugar, and apply the concoction for some seriously smooth skin.
5. Soothing Sniffles
Whether you have a runny nose or allergies, rub just a bit of coconut oil inside your nostrils for relief.
6. Moisturizing Lips
Spread coconut oil over your lips before bedtime for hydration that tastes amazing throughout the night.
7. Removing Makeup
If you have trouble getting off that last bit of mascara, use a dab of coconut oil. Just be careful to not get it directly in your eyes.
8. Protecting Against Razor Burn
Apply coconut oil before shaving to prevent irritation. Bonus: This shaving cream swap makes it easier to clean your razor.
9. Preventing Wrinkles
Use coconut oil on the area around your eyes to prevent wrinkles and under-eye bags.
10. Treating Acne
Apply coconut oil to blemishes, and leave it on for about 15 minutes. Then wash it off with warm water and let your skin air dry (don't apply any other products). The anti-bacterial components in the oil will work to combat acne.
11. Boosting Hair Growth
Apply coconut oil to any areas where hair is sparse (especially in your eyebrows) to promote cell growth.
12. Relieving Sunburns
Apply the oil after you’ve overdone it on the sun exposure to soothe your skin.
Tuesday, March 24, 2015
DIY Easy Rings!
I really like to wear rings but I love making them even more. So why not make some AND be able to wear them? Here's a super easy way how:
What you need:
What you need:
- silver/ gold wire
- gold/silver chain (depending on what color your wire is)
- pliers
First, you will need to cut of a piece of wire that will fit on your finger (Tip: I used a Baby Lips chapstick to mold the shape) You want to make it a midi ring (as shown above) Then repeat this step to make a larger one that will fit like a regular ring
Next, with your pliers, cut a small piece of chain to fit in between the two rings you just made. Thread one of the ends of the chain onto each of your rings so the chain is in the middle connecting the two rings.
You can then tighten the ends of the wire so it looks like a ring and so the ends of the wire don't stick out
There you have your ring!
Thursday, March 19, 2015
2 Ingredient Nutella Cake
I think we all love some cake. Especially easy to make cake! This delicious cake only takes 2 ingredients.
Serving Size: 6
Prep Time: 10 minutes
Cook Time: 30 minutes
Ingredients: 4 large eggs (room tempurature), 240g Nutella
Step 1. Preheat oven to 180°C (160°C fan-forced). Line a 20cm round spring-form cake pan with baking paper and set aside.
Step 2. Place eggs into mixing bowl and beat on high speed until the mixture triples in volume. This will take 5-7 minutes.
Step 3. Spoon Nutella into a medium glass bowl and microwave for 15-20 seconds until it is soft.
Step 4. Spoon one third of the egg mixture and fold using a metal spoon to mix in Nutella until entirely combined. Continue with another third of egg mixture and then again until all the egg and Nutella is combined.
Step 5. Spoon mixture into cake pan and bake for 25-30 minutes or until a skewer placed into the center comes out clean.
Step 6. Cool cake in pan entirely, before removing from pan. Slice and serve. Enjoy!
Subscribe to:
Posts (Atom)